How to send from an email address alias?
Most people have multiple aliases on their mailbox, with aliases on the same email domain or even with multiple domain names. But when you try to send from (send as) one of these aliases you get the following undeliverable error message returned:

“You can’t send a message on behalf of this user unless you have permission to do so. Please make sure you’re sending on behalf of the correct sender, or request the necessary permission. If the problem continues, please contact your helpdesk.”
The answer to this problem is relatively easy, by default and design this isn’t possible, but there are a couple of workarounds available:
- Create a separate mailbox and put the alias on the mailbox and configure it with send as permissions.
- Create a distribution group and put the alias on the distribution group and configure it with send as permissions.
- Create a dummy pop account in outlook and configure the alias as email address.
- There are some third party tools available that create a workaround.
Workaround 1:
Create a separate mailbox and put the alias on the mailbox and configure it with send as permissions.
First we start with removing the alias we want to send as from the original mailbox.

Now we create a new mailbox, give it a logical name, etc. and give the alias as email address.

After the account has been created we need to set Send As permissions for the newly created account. We do this via the Exchange management console by right clicking on the newly created mailbox and choose Manage Send As permissions…
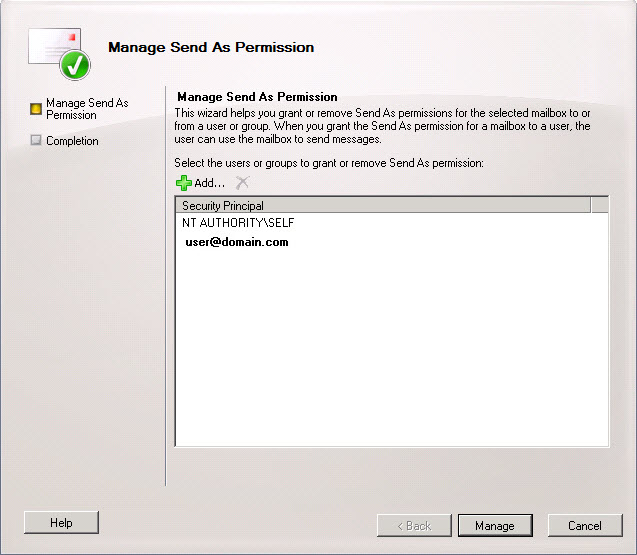
Add the original user (user@domain.com) to grant Send As permission for the alias@seconddomain.com
Now you are able to send as user@domain.com also with the alias@seconddomain.com address.

We do this by using the From… field in outlook, add the alias in the from field when you want to send from the alias. When you don’t see the from field go to the options menu and choose Show From.
Best thing to do is click the From… button and select the alias mailbox from the address list.
Of course when email is send to the alias@seconddomain.com it now will be delivered to this newly created mailbox. If you would like to receive the email just as before in the same mailbox (user@domain.com), then go to the properties of the newly created alias mailbox and choose the Mail Flow Settings tab, select Delivery Options… and choose properties.
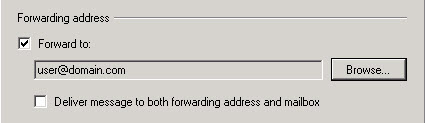
Add the original mailbox at the Forward to: field, via the Browse… button. Now all mail is forwarded to your original mailbox and all mail will be in same mailbox as before removing the alias.
Workaround 2:
Create a distribution group and put the alias on the distribution group and configure it with send as permissions.
First we start with removing the alias we want to send as from the original mailbox.

Now we create a new distribution group, give it a logical name, I always give it the name of the email alias and set the alias as email address.

Then we add the original mailbox as only member.

Now we need to set the Send As permissions for the original mailbox (user@domain.com) on the newly created distribution list. This cannot be done via the exchange management console, we have to use the exchange management shell.

This is the command syntax: Add-ADPermission “public folder name ” -ExtendedRights Send-As -user “Domain\Username”
Now you are able to send as user@domain.com also with the alias@seconddomain.com address.
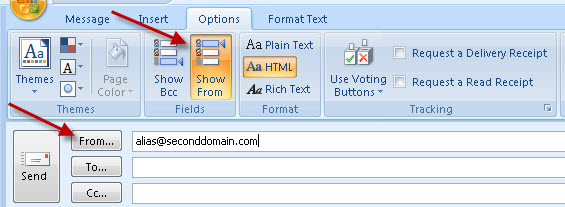
We do this by using the From… field in outlook, add the alias in the from field when you want to send from the alias. When you don’t see the from field go to the options menu and choose Show From.
Best thing to do is click the From… button and select the alias distribution group from the address list.
Workaround 3:
Create a dummy pop account in outlook and configure the alias as email address.
WARNING: This option is the least recommended, because setting up this will create the posibillity to open a security hole for smtp virusses.
With this workaround we leave the email aliases as they are on the mailbox. We are going to configure a dummy / fake pop account in outlook, so no server configuration needed.
Open outlook and go to Account Settings, choose for New…, choose the email services that include Pop3, choose for manual configure server settings and choose Internet E-mail (Pop).
Open outlook and go to Account Settings, choose for New…, choose the email services that include Pop3, choose for manual configure server settings and choose Internet E-mail (Pop).
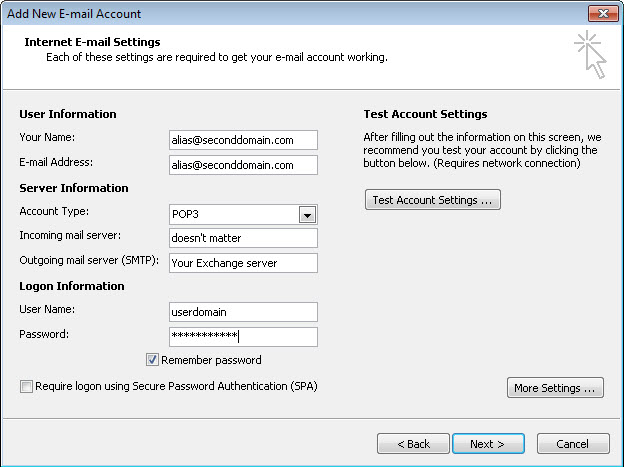
At Your Name: we give your name (this is the name the receiver will see), at E-mail Address we give alias@seconddomain.com, at incoming mail server, just give in something it doesn’t matter, at outgoing mail server give in your Exchange server and at username and password give in your logon credentials (the users domain account credentials).
Choose More Settings…

Make sure that you enable “My outgoing server (SMTP) requires authentication” on the Outgoing Server tab. This is needed to let you send via your exchange server, then finish the wizard.
Now you are able to send as user@domain.com also with the alias@seconddomain.com address.

We do this by using the Account button that is created after creating the dummy pop account. You just choose the email address you would like to send your email from.
Conclusion:
So you see there are a couple of workarounds available, which one is the best, there isn’t it all depends on your needs and wishes.
